Creating beautiful coils with a comb is one of the easiest and most affordable ways to define natural curls and add texture to the hair. Whether you have short natural hair, type 4 curls, relaxed hair, or even wavy textures, using a comb to coil the hair can produce stylish, defined spirals without expensive salon treatments.
Hair coiling is particularly favored by individuals with natural hair, as it improves curl definition and aids in controlling shrinkage and frizz. Best of all, this technique can be done at home with simple tools and the right products.
In this complete guide, you’ll learn how to coil hair with a comb, the best products to use, common mistakes to avoid, maintenance tips, and answers to frequently asked questions.
What Does It Mean to Coil Hair?
Coiling hair is a technique where tiny sections of hair are twisted around themselves or a tool to create spiral curls. When done with a comb, the comb helps guide and shape the strands into smooth, defined coils.
This hairstyle is commonly used for:
- Defining natural curls
- Creating uniform spirals
- Enhancing texture
- Reducing frizz
- Styling short natural hair
- Stretching curl patterns slightly
Comb-coiled hair can last several days or even weeks with proper care.
Benefits of Coiling Hair With a Comb
Coiling hair with a comb offers many advantages, especially for people with curly or coily hair textures.

1. Enhances Curl Definition
Comb coils help separate curls and create a more defined appearance.
2. Low-Cost Styling Method
You only need a comb and styling products, making this an affordable hairstyle.
3. Works on Different Hair Lengths
Comb coil hair can be created on:
- Short hair
- Medium-length hair
- Long hair
Short natural hair often shows the best results.
4. Protective Styling Benefits
Coiling reduces daily manipulation, helping prevent breakage.
5. Beginner-Friendly
Even beginners can learn this technique with practice.
Hair Types That Work Best for Comb-Coil Hair
Comb coil hair works best on textured hair types, especially.
- 3C hair
- 4A hair
- 4B hair
- 4C hair
People with looser curls or wavy hair can still create coils, but they may need stronger holding products.
Tools Needed to Coil Hair With a Comb
Before starting, gather all necessary tools.
Essential Tools
- Wide-Tooth Comb
Used for detangling hair gently.
- Rat-Tail Comb
Helps create clean sections.
- Small-Tooth Comb
The main tool used for coiling.
- Spray Bottle
Keeps hair damp during styling.
- Hair Clips
Hold sections in place.
- Satin Scarf or Bonnet
Protects coils overnight.
Best Products for Comb-Coil Hair
Using the right products helps the coily hair stay neat and defined.
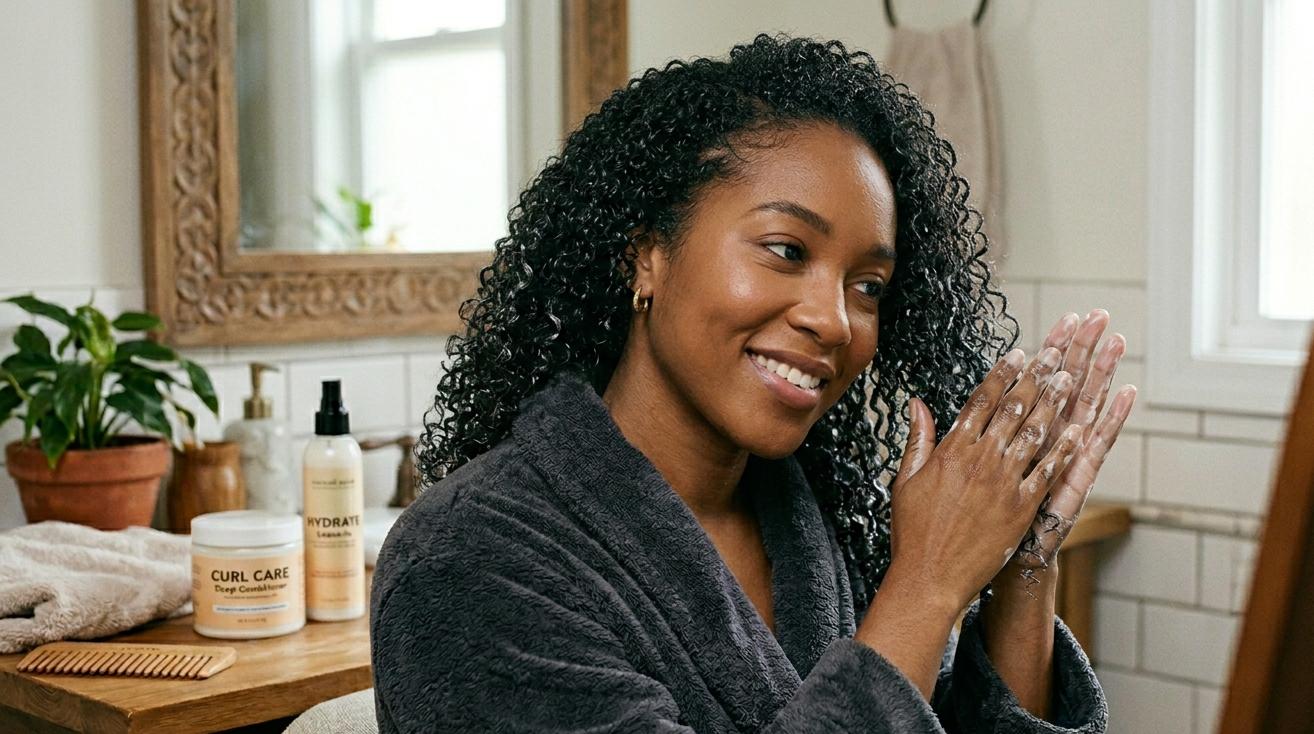
1. Leave-In Conditioner
Leave-in conditioner moisturizes the hair and makes it easier to manage.
Benefits:
- Prevents dryness
- Softens curls
- Reduces frizz
2. Curl Cream
Curl creams add moisture while enhancing definition.
3. Styling Gel
A stronghold gel helps the coil hair stay intact longer.
Look for:
- Alcohol-free formulas
- Non-flaking gels
4. Hair Oil
Lightweight oils add shine and help seal in moisture.
Good options:
- Argan oil
- Jojoba oil
- Castor oil
Preparing Hair for Comb coil hair
Preparation is one of the most important steps.
Step 1: Wash the hair.
Clean hair helps products work better.
Use:
- Sulfate-free shampoo
- Moisturizing conditioner
Dirty hair can cause buildup and reduce curl definition.
Step 2: Deep Condition
Deep conditioning softens the hair and improves manageability.
Leave the conditioner on for 15–30 minutes.
Step 3: Detangle Thoroughly
Use a wide-tooth comb or fingers to remove knots carefully.
Always detangle from the ends upward.
Step 4: Keep Hair Damp
Comb coil hair work best on damp hair.
Use a spray bottle if the hair begins drying during styling.
Step-by-Step Guide: How to Coil Hair With a Comb
Now let’s go through the full process.
Step 1: Section the Hair
Divide the hair into manageable sections using clips.
Smaller sections make styling easier and more organized.
Step 2: Apply Leave-In Conditioner
Apply leave-in conditioner evenly through each section.
Focus on:
- Ends
- Dry areas
- Frizzy spots
Step 3: Add Styling Products
Apply curl cream or gel to the section.
Do not use too much product because excessive buildup may cause flakes.
Step 4: Take a Small Piece of Hair
Use a rat-tail comb to separate a small piece of hair.
The smaller the section:
- The tighter the coil
- The more defined the result
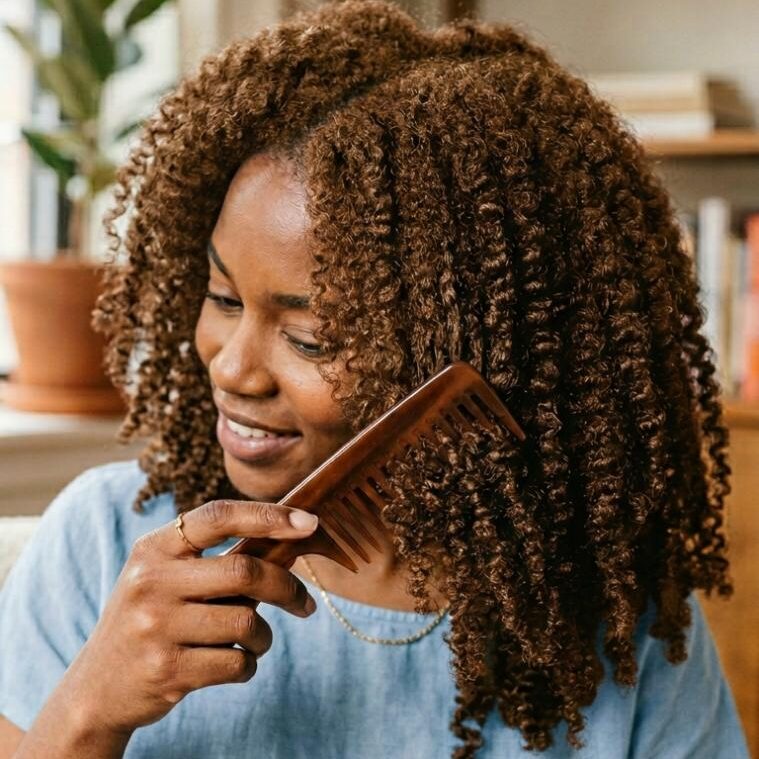
Step 5: Insert the Comb Near the Root
Place the fine-tooth comb near the scalp.
The comb should hold the hair securely.
Step 6: Twist the Comb
Rotate the comb slowly while pulling downward.
This twisting motion wraps the hair around itself, forming a coil hair.
Keep twisting until the whole segment creates a spiral.
Step 7: Release Carefully
Slide the comb out gently without disturbing the curl.
You should see a defined coil hair shape.
Step 8: Repeat Across the Head
Continue the process section by section until all the hair is coiled.
Patience matters, as the procedure may require time.
Step 9: Allow Hair to Dry.
Let the coil hair air-dry completely.
You may also use:
- Hooded dryer
- Diffuser on low heat
Avoid touching the coils while drying.
Step 10: Separate for Volume (Optional)
Once dry, you can leave the coils intact or gently separate them for more fullness.
Use oil on your fingers to reduce frizz while separating.
How Long Does Comb-Coil Hair Last?
Comb coil hair can last:
- 1–2 weeks on short hair
- Several days on softer textures
Longevity depends on the following:
- Hair type
- Products used
- Nighttime protection
- Weather conditions
Tips for perfect comb-coil hair
Use small sections.
- Smaller sections create cleaner and longer-lasting coils.
Don’t rush.
- Working too quickly may cause uneven curls.
Avoid Excess Product.
- Too much gel can make the hair stiff or flaky.
Keep Hair Moisturized
- Dry hair becomes frizzy faster.
Protect Hair at Night
Always sleep with:
- Satin bonnet
- Satin pillowcase
- Silk scarf
Common Mistakes to Avoid
1. Styling Dry Hair
Dry hair can lead to frizz and poor definition.
2. Using Heavy Products
Heavy products may weigh down the coils.
3. Skipping Detangling
Tangling makes the coils uneven.
4. Touching Hair Too Much
Excessive touching creates frizz.
5. Using Dirty Tools
Clean combs help maintain scalp hygiene and smooth styling.
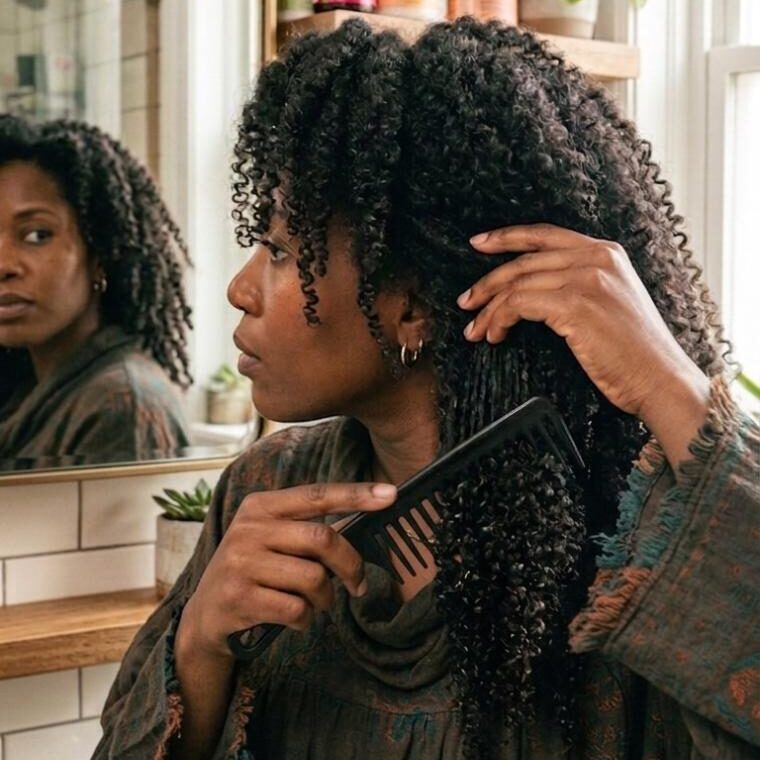
How to Maintain Comb coil hair
Maintenance is essential for keeping the style fresh.
- Moisturize daily.
Gently mist the hair with water or a leave-in conditioner.
- Avoid Excess Manipulation.
Constant touching can unravel the coils.
- Cover Hair at Night.
This reduces friction and preserves the style.
- Refresh Frizzy Areas
Use gel and recoil any loose sections.
Can a comb coil help hair growth?
Comb coils themselves do not directly grow hair, but they support healthy hair practices.
Benefits include:
- Reduced breakage
- Low manipulation
- Moisture retention
- Less tangling
These factors help retain hair length over time.
Comb-coil hair on short hair.
Comb coils are especially popular for short natural hair.
Benefits of short hair:
- Enhances curl pattern
- Adds texture
- Easy to manage
- Stylish appearance
Many people start comb coils during the early stages of natural hair growth.
Comb coil hair on long hair.
Longer hair can also be coiled successfully.
Tips:
- Work in smaller sections
- Use lightweight products
- Allow extra drying time
Long coils may appear stretched and elongated.
Best Hairstyles After Comb Coils
Once the coils are formed, you can style them in different ways.
- Coil-Out
Separating coils creates a fuller hairstyle with volume.
- Updos
Coils can be pinned into elegant updos.
- Ponytails
A coiled ponytail creates texture and definition.
- Mohawk Styles
Perfect for bold and stylish looks.
How to Wash Comb Coils
Eventually, the style will need to be cleansed.
Washing Tips:
- Use diluted shampoo.
- Massage the scalp gently.
- Avoid rough scrubbing.
- Follow with conditioner.
After washing, you may need to redo the coils.
Comb Coils vs. Finger Coils
Both styles create defined curls, but the methods differ.
Comb Coils
- Faster for some people
- More uniform
- Easier on short hair
Finger Coils
- More control
- Softer appearance
- Takes longer
Both methods can produce beautiful results.
Are Comb Coils Damaging?
Comb coils are generally safe when done correctly.
Damage usually happens from:
- Excess tension
- Rough combing
- Dry hair
- Product buildup
Gentle handling keeps the hair healthy.
Seasonal Care for Comb Coils
Winter
Cold air can dry out coils.
Tips:
- Use richer moisturizers
- Protect hair from harsh weather
Summer
Humidity may increase frizz.
Tips:
- Use anti-frizz gel
- Avoid excessive sweating on the scalp
DIY Natural Products for Comb Coils
Aloe Vera Gel
- Aloe vera defines curls naturally while adding moisture.
Shea Butter Mix
- Whipped shea butter helps seal hydration into the hair.
Flaxseed Gel
- Flaxseed gel serves as a natural substitute for store-bought styling gels. Lightly spray the hair with water or leave-in conditioner.
Benefits:
- Lightweight hold
- Adds shine
- Reduces frizz
Signs Your Comb Coils Are Healthy
Healthy coils should:
- Feel soft
- Look shiny
- Hold definition
- Have minimal frizz
- Retain moisture
If your hair feels stiff or brittle, your products may need adjustment.
How Often Should You Redo Comb Coils?
Most people redo the style every
- 1–2 weeks
- After wash day
- When frizz becomes excessive
Over-styling can stress the hair, so avoid unnecessary manipulation.
Are finger coils good for hair?
Yes, finger coils can be very good for hair when done properly. They are considered a low-manipulation hairstyle, which means they help reduce daily combing, brushing, and heat styling that often lead to breakage.
Finger coils are especially popular for curly and coily hair types because they enhance natural curl definition while helping retain moisture.
Benefits of Finger Coils
1. Reduce Breakage
Since the hair stays styled for several days or weeks, there is less daily handling. Less manipulation usually means less breakage.
2. Improve Curl Definition.
Finger coils shape the hair into uniform curls, making natural texture look more defined and polished.
3. Help With Length Retention.
Protective styling can help hair retain length by reducing split ends and tangling.
4. No Heat Required.
Finger coils are created without flat irons or curling tools, which helps prevent heat damage.
5. Keep Hair Moisturised.
Most finger coil routines include leave-in conditioners and creams that support hydration.
Potential Downsides
Finger coils can become damaged if they are done incorrectly or maintained poorly.
- Too Much Tension
Twisting the hair too tightly may stress the roots and edges.
- Product Buildup
Using excessive gel or heavy products can clog the scalp and dry the hair over time.
- Tangling
Leaving coils in too long without proper care can lead to knots and matting.
- Dryness
If the hair is not moisturized regularly, coils may become brittle.
Tips to Keep Finger Coils Healthy
- Start with clean, moisturized hair.
- Use lightweight styling products.
- Avoid twisting too tightly.
- Sleep with a satin bonnet or pillowcase.
- Moisturize the hair regularly.
- Don’t leave the style in too long.
Who Benefits Most From Finger Coils?
Finger coils work best for:
- Type 3 curly hair
- Type 4 coily hair
- Short natural hair
- Transitioning hair
They are also a great styling choice for people growing out a short haircut or starting a natural hair journey.
How Long Should Finger Coils Stay In?
Most people keep finger coils for the following:
- 1–2 weeks for loose textures
- Up to 3 weeks for tighter coils
Removing them gently and detangling carefully helps prevent breakage afterward.
Read more: How to deep condition curly hair
FAQs About How to Coil Hair With a Comb
1. Can you curl straight hair with a comb?
Yes, but stronger styling products may be needed because straight hair does not naturally hold coils as easily.
2. How long do comb coils take?
Depending on hair length and thickness, combing coils can take 1–3 hours.
3. Are comb coils good for hair growth?
They help reduce breakage and support healthy hair retention.
4. Should hair be wet or dry for combing coils?
Damp hair works best because it is easier to shape and define.
5. Can I sleep with comb coils?
Yes, protect them with a satin bonnet or silk scarf.
6. Why are my comb coils frizzy?
Frizz may result from dry hair, too much touching, or insufficient product.
7. What gel is best for comb coils?
Alcohol-free gels with strong hold work best.
8. How do I make comb coils last longer?
Keep the hair moisturized, avoid touching it excessively, and protect it at night.
9. Can comb coils damage hair?
No, not when done gently and with proper moisture.
10. What is the difference between finger coils and comb coils?
Finger coils are created using fingers, while comb coils use a fine-tooth comb for shaping.
Conclusion
Learning how to coil hair with a comb is a simple and effective way to enhance natural curls while protecting the hair from daily damage. This technique works especially well for coily and curly textures because it improves definition, reduces frizz, and creates a stylish appearance without heat.
With the right products, patience, and maintenance routine, comb coils can last for days or even weeks while keeping the hair healthy and moisturized. Whether for the following:
Have short natural hair or longer curls? Combing coily hair is a versatile styling method worth trying. Consistency and gentle care are the keys to achieving beautiful, long-lasting coils. If you have any queries, please don’t hesitate to reach out fajarhafeez117@gmail.com.